What are linked items?
Salesforce’s linked items (linked choice list) is a function that links two choice lists and changes the contents of the other choice list according to the choices in one choice list. For example, after a user selects a country, the system will display the prefectures and states related to that country. In this way, the user can select only relevant choices, preventing input errors and maintaining data consistency.
Use Cases of Linked Items
- Entering address information: Allow the user to select only the relevant prefecture after selecting the country first.
- Product Selection: After selecting a manufacturer, the list of products related to that manufacturer can be narrowed down.
- Support Request Classification: The available subcategories will change depending on the category of the problem.
- Choice for each phase: The choices available for each phase should change.
These examples allow users to input accurate information efficiently and improve the smoothness of operations.
Procedure for Setting Linked Items
The specific steps for setting up interlocking items are detailed below.
Step 1: Determine control items and linked items
First, prepare two selection list items: a control item (parent item) and a linked item (child item). For example, “Country” is the control item and “Prefecture” is the linked item.
For example, “Country” is the control item and “Prefecture” is the linked item. On the other hand, the linked items can be of two types: “selection list” and “multiple selection list.
Step 2: Check items in the Object Manager
- Select the object for which you want to set the linked items (e.g., “Business Partner Manager” or “Business Meeting”).
- Click on the “gear mark ⚙️” -> “Edit Object” in the upper right corner of the Salesforce screen to go to the Edit Object screen.
- Select “Items and Relations” from the menu on the left to see the list of selections to be used as control and dependency items.
Step 3: Setting Dependencies
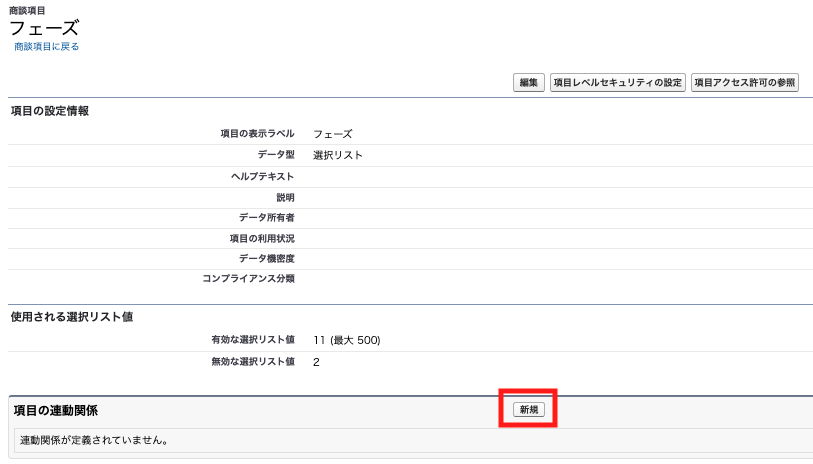
(1) From “Items and Relations,” select the selection list to be the control item or interlocking item, and click the “New” button under “Item Interlocking Relations.

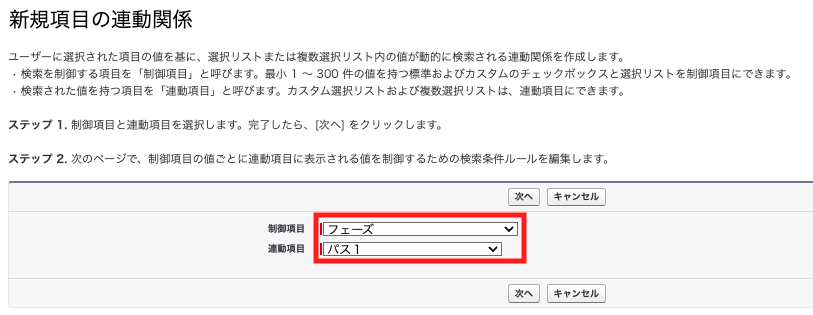
(2) Select control items and linked items as shown below.

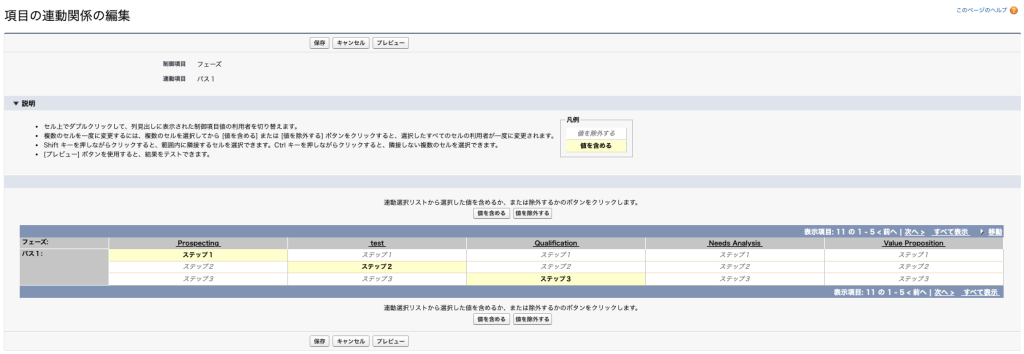
(3) Click “Next” to set which choices of interlocking items will be displayed for each control item choice in a matrix format.

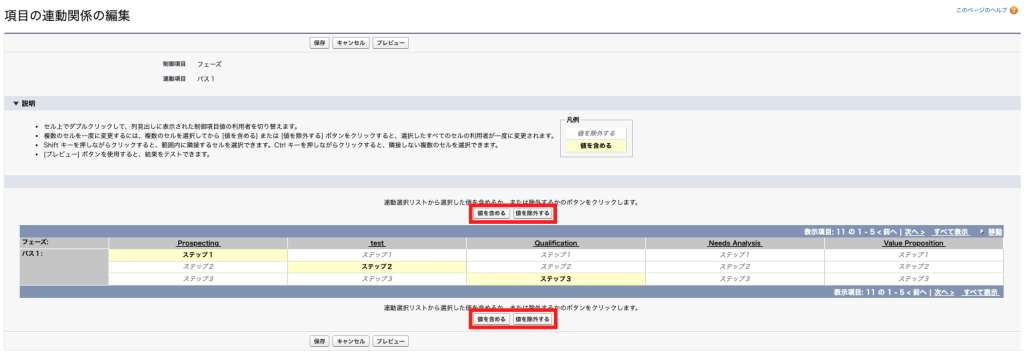
(4) Set which choices of interlocking items are to be displayed for each control item. For example, if you want to display the choices for “Step 1” in the “Prospecting” phase, click on “Step 1” in “Prospecting” and click on the “Include Value” button. By doing so, you will finalize the choices to be displayed. The following image shows how “Step 1” is displayed for “Prospecting”, “Step 2” is displayed for “test”, and “Step 3” is displayed for “Qualification”. If you want to hide “Step 2” when “test” is selected, click on the “Exclude Value” button after clicking on “Step 2” to exclude it.

Step 5: Check and Save Dependencies
- When all settings are complete, click “Save”.
- Check that the linked items are linked correctly when you actually select a control item on the record creation or editing screen.
Step 6: Verify Profile and Page Layout
Adjust the profile and page layout as necessary.
By following these setup steps correctly, you will have a system in place that allows users to efficiently enter the information they need, and your business processes will run more smoothly.
